Best Practices for Displaying Fine Art Photography
In this guide, we talk about how to properly display fine art photography in your home or space. Proper placement, spacing, and height can transform a print from an object on the wall into a focal point that shapes the atmosphere of an interior. These guidelines are intended to help you present your artwork with clarity, balance, and intention.
Placement & Height
Eye-level is a starting point, not a rule.
- Standard center height: ~57–60 inches from floor to image center
- Adjust based on:
- furniture height
- ceiling scale
- viewing distance
- The artwork should feel anchored to the room, not floating above it.
Key principle:
The artwork should feel anchored to the room, not floating above it.
Spacing & Composition
For single pieces:
- Allow negative space around the work
- Avoid crowding adjacent décor
For groupings:
- 2–3 inches between frames (tight, gallery feel)
- 4–6 inches for more relaxed compositions
Key principle:
Spacing should feel intentional, not decorative.
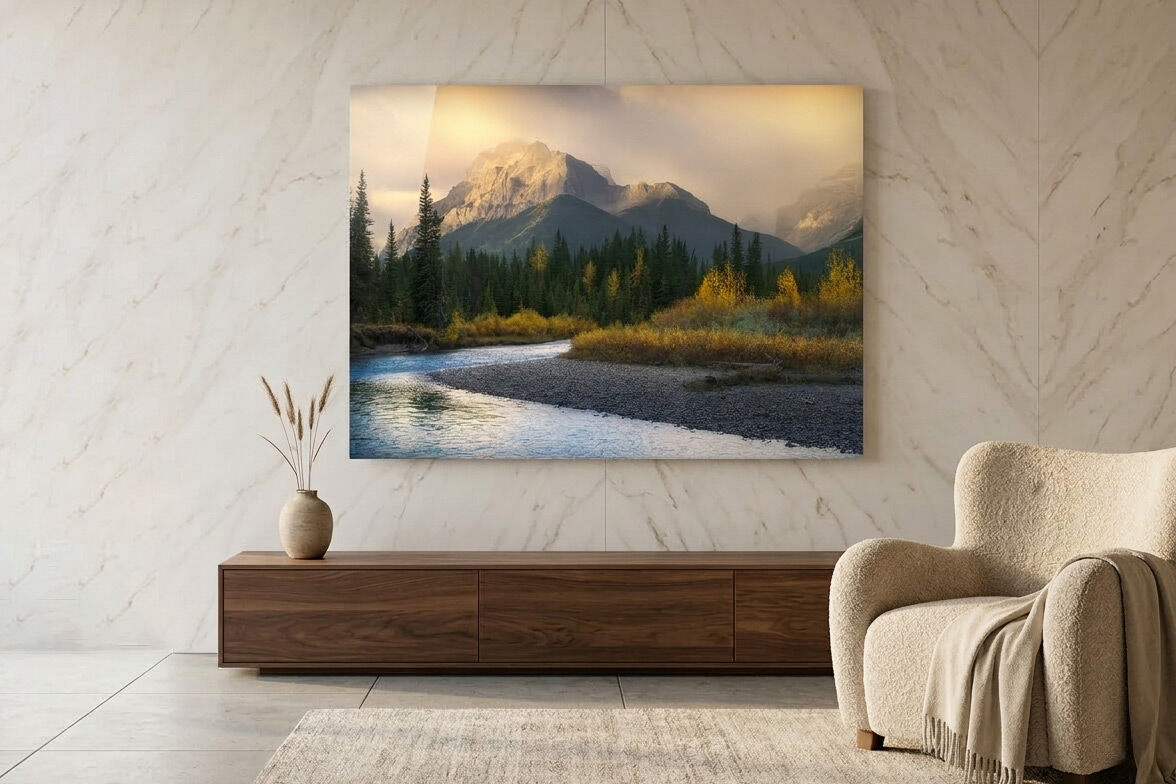
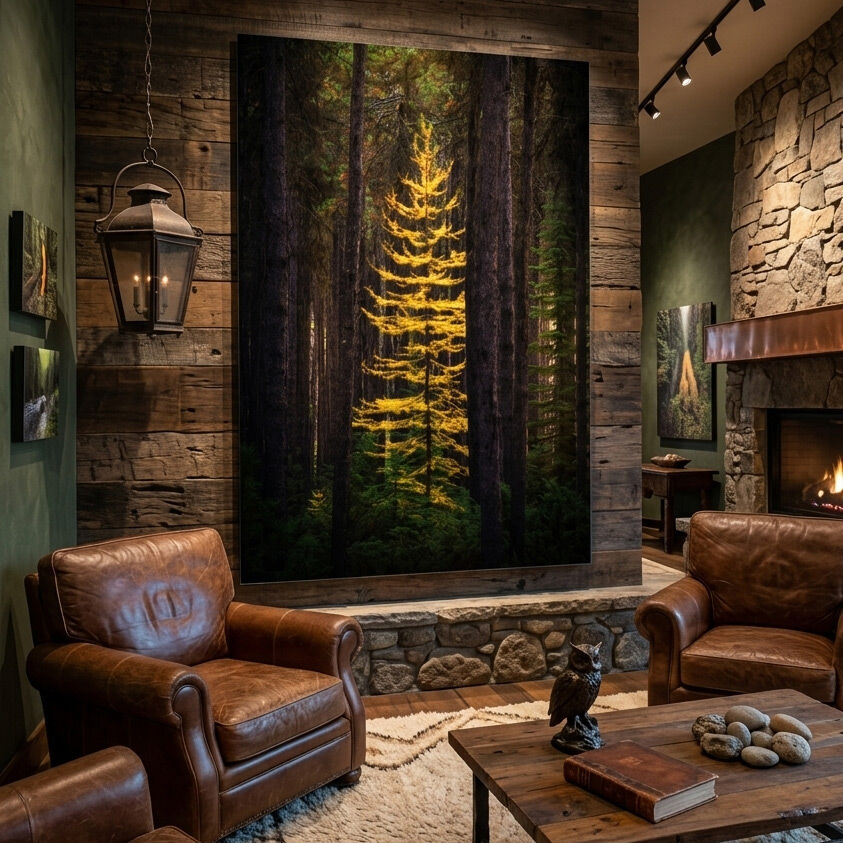
Scale & Proportion
- Large walls → oversized statement pieces or diptychs/triptychs
- Small walls → restrained compositions, not cluttered clusters
- Sofa/console rule:
- Artwork should be ~60–75% of furniture width
Key principle:
Scale should always relate to architecture, not just wall space.
Alignment & Balance
- Align with architectural anchors when possible:
- windows
- doorways
- furniture edges
- Use center alignment for calm symmetry
- Use offset placement for more dynamic interiors
Key principle:
Architecture should guide placement—not compete with it.
Hanging Hardware & Protection
- Use appropriate weight-rated hanging systems (all hanging hardware is included with my ready-to-hang Metal & Acrylic Prints, as well as framed Acrylic Prints)
- Avoid direct pressure on frame corners
- Keep prints away from direct moisture or heat sources
Key principle:
Proper mounting preserves both longevity and presentation.
Lighting Your Artwork
Once positioned, lighting becomes the final layer.
- Avoid direct glare or hotspots
- Use angled or diffused lighting when possible
- Let texture and tonal range emerge naturally
See my page on Lighting Your Fine Art Prints Properly
The Gallery Standard
In galleries and museum environments, artwork is rarely treated as decoration—it is installed with intention, proportion, and restraint. Every decision, from height to spacing to lighting, is made to support the visual and emotional weight of the work itself.
A few guiding principles define this standard:
- Consistency of height: Works are typically centered at a unified eye level to create visual continuity across a space.
- Respect for negative space: Walls are not filled, but composed—allowing each piece in the room to breathe.
- Intentional spacing: Groupings are carefully measured rather than loosely arranged, maintaining rhythm and balance.
- Lighting as a finishing layer: Illumination is used to reveal tone, texture, and depth without overpowering the image.
- Hierarchy of focus: The artwork always remains the focal point—never competing with décor or architecture.
Bringing this approach into a private space elevates the experience of living with fine art. It shifts the work from being simply displayed to being curated within an environment, echoing the same principles used in professional exhibitions.
Proven Methods For Hanging Fine Art Prints
Fine art photography reveals its full presence when it is thoughtfully placed within a space. These guidelines are not rigid rules, but principles intended to help you present each image with the same care and intention with which it was created.
For collectors and designers seeking a more refined and secure installation approach—particularly for medium to large works—professional mounting systems can play an important role in both presentation and stability. French cleat systems offer a museum-grade solution for larger, heavier pieces, allowing for a clean, flush installation with exceptional structural support. Wall Buddies systems provide a similarly elevated alternative for medium to large scale works, combining precision alignment with a minimal, gallery-like appearance.
Whether using traditional hanging methods or more advanced mounting systems, the goal remains the same: to allow the artwork to sit in harmony with its environment, free from distraction, and supported with the same intentionality in display as it was in creation.
Below, we will go over the two methods of hanging.
How to Hang Fine Art Prints Using a French Cleat Hanger
A well-presented fine art print should feel intentional—like it belongs exactly where it’s placed. One of the most secure, clean, and professional ways to mount artwork is with a French cleat hanging system, included with my ready-to-hang Chromaluxe Metal Prints and TruLife® Acrylic Prints. It’s a simple concept, but when installed correctly, it delivers gallery-level results with excellent stability and long-term reliability.
Below is a practical guide to hanging fine art prints using a French cleat style hanger, including setup, alignment, and finishing details.
What Is a French Cleat System?
A French cleat is a two-part interlocking mounting system:
- One cleat is attached to the wall (angled upward)
- The matching cleat will come preinstalled on the back of the artwork.
When the artwork is lifted onto the wall cleat, the two pieces lock together securely, distributing weight evenly across the entire length of the print.
This method is especially popular for:
- Larger, heavier fine art pieces
- Large-format photography
- Museum and gallery installations
- Clean, “floating” wall presentations
Why Use a French Cleat for Fine Art Prints?
Compared to traditional wire or sawtooth hangers, a French cleat offers several advantages:
1. Superior stability
The load is distributed evenly across the wall, reducing stress on any single point.
2. Perfect leveling every time
Once installed correctly, the artwork naturally aligns level without adjustment.
3. Flush, professional appearance
The print sits close to the wall with no visible hardware.
4. Easy removal and repositioning
The print can be lifted off and reinstalled without re-measuring.
Tools and Materials You’ll Need
Before beginning, gather the following:
- French cleat hardware (included with all Metal Prints, and larger, Framed Acrylic Prints. Float Mount Acrylics will come with Wall Buddies, which are discussed in the next section)
- Stud finder
- Level (preferably 24" or longer for larger prints)
- Drill and appropriate bits
- Screws and wall anchors (if not mounting into studs)
- Pencil or painter’s tape
- Measuring tape
Step 1: Plan Your Placement
Start by deciding exactly where your print will hang.
- Use painter’s tape to mark the top edge of the artwork on the wall
- Step back and check alignment with furniture, sightlines, and surrounding pieces
- Keep the center of the artwork at roughly eye level (typically 57–60 inches from the floor)
Take your time here—this step determines the final visual impact.
Step 2: Locate Wall Studs
For heavier prints, always mount the wall cleat into studs when possible.
- Use a stud finder to locate framing behind the drywall
- Mark stud locations lightly with a pencil
- If studs aren’t available in the exact position, use high-quality wall anchors rated for the weight of your print
A properly mounted cleat should feel completely solid before hanging artwork.
Step 3: Install the Wall Cleat
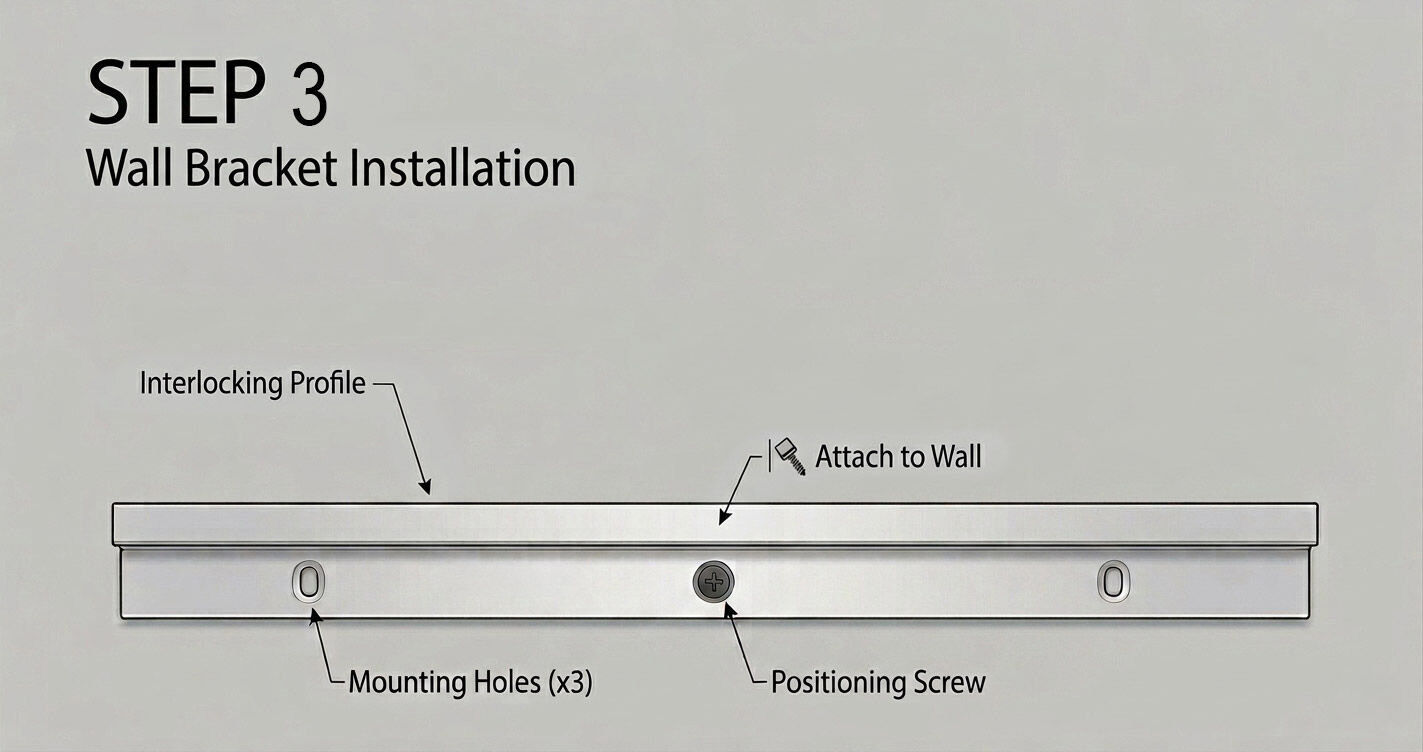
- Hold the wall cleat on your marked line
- Use a level to ensure it is perfectly straight
- Mark drill points through the cleat holes
- Drill pilot holes into studs or anchor points
- Secure the cleat firmly to the wall using screws, starting with the middle screw first. This is your positioning screw. Re-check with level, then screw in remaining screws.
Double-check tightness—this is the structural foundation of your installation.
Step 4: Hang the Artwork
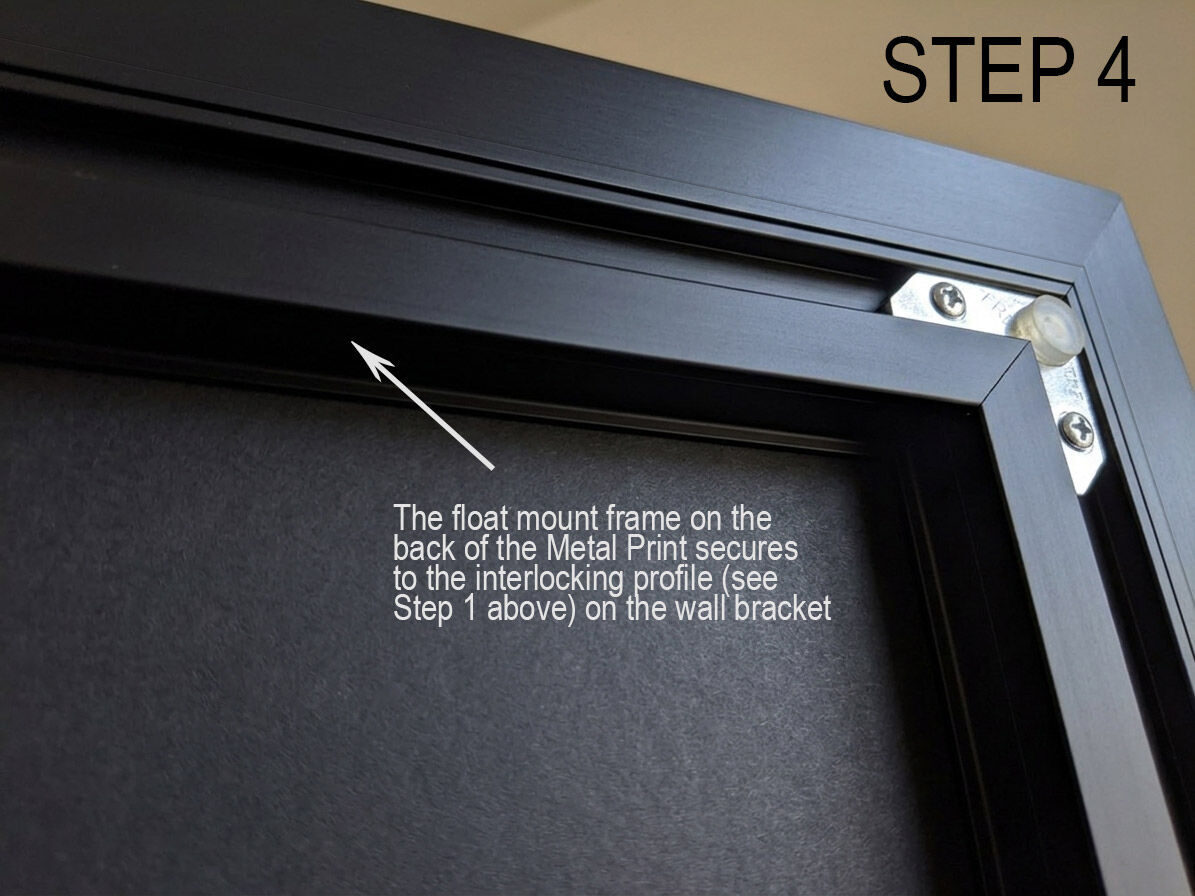
This is the satisfying part.
My ready-to-hang fine art print options (including Metal and Acrylic pieces) arrive with a pre-installed backing system designed for cleat mounting (or wall buddies on Acrylic Prints).
- Lift the print slightly above the wall cleat
- Gently lower it until the two cleats interlock at the location shown in the above image
- Center it so weight is evenly distributed
- Let the print settle into place
Once seated, it should feel locked in and stable.
Step 6: Final Adjustments
Although French cleats self-level, small refinements can help:
- Check alignment visually from a distance
- Adjust spacing if hanging multiple pieces in a grid or series
- Clean fingerprints or smudges from the print surface
For large installations, use a second person to confirm alignment from across the room.
Best Practices for Fine Art Displays
To get the most out of your installation:
- Avoid extended periods of direct sunlight to preserve print longevity
- Ensure wall surfaces are dry and stable before mounting
- Use museum-style spacing when hanging multiple pieces
- Pair cleat-mounted prints with proper lighting for a gallery effect
Final Thoughts
A French cleat system is one of the most reliable ways to display fine art prints, especially when presentation and longevity matter. It removes the guesswork of traditional hanging methods and provides a clean, secure, and professional finish worthy of gallery walls.
When done properly, the installation disappears—and all that remains is the artwork itself, presented exactly as it was meant to be seen.
Hanging Fine Art Prints with Wall Buddies

Wall Buddies offer a secure and refined method for hanging fine art photography, designed to provide stability, balance, and a clean presentation without visible hardware. Using a dual-point mounting system, they allow framed prints to sit close to the wall while remaining easy to level and adjust. Wall buddies come standard on Acrylic Prints.
This approach is widely used in professional installations and is particularly well-suited for collectors seeking a reliable, gallery-style hanging method for medium to large works.
How the System Works
Standard Wall Buddies consist of two brackets mounted to the upper corners on the back of the frame. These brackets rest on corresponding wall hooks or fasteners, distributing the weight evenly across both sides.
This dual-point system prevents shifting and helps the artwork remain level over time—an important detail for maintaining a polished, intentional presentation.
Installation Overview
1. Establish placement
Begin by determining the ideal position for the artwork. For single pieces, a center height of approximately 57–60 inches from the floor is a reliable starting point, adjusted as needed based on furniture, ceiling height, and surrounding elements.
2. Measure bracket spacing
Measure the distance between the two Wall Buddies brackets on the back of the frame. Transfer these measurements carefully to the wall, ensuring both points are level and aligned.
Precision at this stage is key to achieving a clean, balanced result.
3. Install wall hooks
Secure the appropriate wall hooks or anchors at your marked points. Whenever possible, mount into wall studs for maximum support. If studs are not available, use high-quality anchors rated for the weight of the artwork.
4. Hang and align
Lift the frame into position, placing each bracket onto its corresponding hook. Once hung, the frame can be adjusted slightly from side to side to achieve perfect leveling.
Advantages of Wall Buddies
- Even weight distribution across two mounting points
- Reduced shifting compared to single-hook systems
- Clean, low-profile presentation
- Simple leveling adjustments during installation
- Reliable support for medium to large framed prints
Best Use Cases
Wall Buddies are ideal for:
- Medium to large fine art photography prints
- Structured gallery walls
- Interior spaces requiring clean, consistent alignment
- Installations where stability and ease of adjustment are important
Final Note
When installed with care, Wall Buddies provide a stable and understated mounting solution that supports the presentation of fine art without distraction. The dual-point system keeps each piece aligned and balanced, allowing the artwork to settle naturally within the space—quietly reinforcing its presence while maintaining a refined, gallery-like standard of display.
If you have any questions about hanging your artwork, please do not hesitate to Contact me.